A go to guide for everything vaping.

In this article...
If you’re a new vaper, or even if you’re not, e-cigarettes can be quite confusing at times. Well this guide has you covered. We’ll cover everything you need to know to get your vape up and running, and keep it that way. So take a seat, get out your notepad and pens, it’s time to begin ‘vaping 101’.
Vaping 101: Coil Resistances Explained
Coils, atomizers, thingies, the part that makes the vapour is known by many names. The first thing you should check when setting up your device is the coil resistance. If you’re using a device where you can adjust the power, then the it will tell you what power level it’s best to use it at. Even if you’re using a kit that has fixed power settings, it’s still important as it affects the overall vape experience.

The coil resistance is usually found written on the side or bottom, usually accompanied by a wattage range. This is the sweet spot that it will run best at.
As you can see on this VOOPOO PnP, it’s 0.2ohm and runs between 40-55W.
Usually, you can find the type written on them as well. This is a PnP TW20, so knowing this is useful when looking to buy replacements in the future.
Vaping Style and Coil Resistance.
The resistance usually tells you how much vapour will be produced and how tight the draw is. The higher the resistance, the tighter the draw.
There are three main types of coils which are mouth to lung (MTL), restricted direct lung (RDL) and direct lung (DL). Let’s break down what that means.
| MTL | RDL | DL |
| 1.0ohm or above | around 0.8ohm | below 1.0ohm |
| MTL coils usually replicate the feel of a cigarette. The vapour is drawn into the mouth and then inhaled to the lungs. | An RDL draw is inhaled directly to the lungs, but these coils can also give a loose MTL experience. Most RDL coils are 0.8ohm. | DL vapers inhale the vapour directly into their lungs. These coils produce a lot of vapour and are commonly vaped by 'cloud chasers' |
Most new vapers start on MTL and stick with that throughout their vaping life. Others, like myself, transition on to RDL or DL vaping. It doesn’t really matter which style you choose to vape, as long as it feels natural and you enjoy it.
Making sure that your kit is set to the correct wattage helps prevent your coils burning out too quickly, or if the wattage is set high enough, instantly.
Vaping 101: Adjusting the Airflow

The coil isn’t the only way to make your vape feel different. Some kits have adjustable airflow that lets you make the inhale tighter. This is usually changed via a ring at the bottom of the tank or a sliding switch on the device.
If your kit isn’t giving you any vapour when you use it, this is one of the first things that you should check after making sure it’s turned on.
Vaping 101: Priming/Changing Your Coil
Whether you’re changing a burnt coil, or installing a new one for the first time, priming is a very important step. If you don’t, then you could burn it out as soon as you use your device.

The first thing you need to do, before you put your coil into the tank, is add a few drops of liquid down the centre hole at the top. I usually put around 8-10 drops, but feel free to add a little more if needed. It also helps to tilt the coil to spread the liquid around evenly.
Next, you can add more liquid to the wicking holes on the side if the cotton isn’t saturated enough. If those holes are covered, then don’t worry about this step.
If you went a little overboard with the liquid, give the coil a gentle shake to get rid of any excess. This helps stop it from flooding.
Pop the coil into the tank or pod, fill it up and wait 5-15 minutes before vaping. This just makes sure it is nice and saturated with liquid.
Filling Your Tank/Pod
Filling your tank or pod with liquid works differently depending on what you’re using.
Tanks often have a filling hole at the top. Sometimes this is covered with a screw off cap, or a top that slides to one side. Some tanks, like the CS Air Slim tank fill from the bottom and require unscrewing.
Pods usually fill in one of two ways. Either they have a little rubber bung to cover the filling hole, or they have a snap off cap that reveals it.
Turning Your Device On & Off
This is a nice easy one, but is sometimes overlooked by vapers who transition from an auto-draw device to one that uses a fire button. Also, new vapers might not know that their kit needs to be turned on or off.
When a device has a fire button then it will more than likely have an on/off function. This can be activated with five quick clicks of the fire button, and will usually be accompanied by a flash of the indicator light or an animation on the screen. Note that if you’re using an Innokin kit, it’s 3 clicks instead of 5.
We recommend turning your kit off whenever you put it in your pocket or bag. This helps prevent accidental burnouts. Dry burn smells unpleasant and ruins your coil.
Vaping 101: Changing the Settings
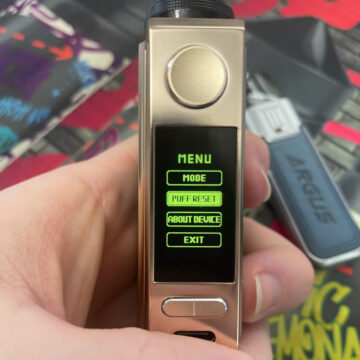
If your kit has a screen then it probably has settings. These are usually accessed by holding down the wattage + and – buttons at the same time. Also, the menu will vary from range to range, and often features different power modes.
The best way to find out what each setting does is to consult the instruction manual included with your kit.
Vaping 101: Charging Your Kit
It’s always a good idea to check which brands are compatible with each other. For example if you’re charging a low powered device with a 3A phone plug, then it could cause damage to the cells inside your battery and reduce its lifespan.
Depending on what kind of battery your kit has determines the way to charge it.
Units that have the older micro USB connection, that’s the one with a ‘D’ shape, require a 1.0A outlet. Make sure you check the plug you’re using to ensure that it says 1.0A. If you’re unsure then you can always pick up a 1.0A USB Wall Adaptor on our site for £5.99.
USB-C is the newer connection and looks like a flattened ‘O’. These can often take up to 3.0A, but it’s best to check your device instruction manual to be sure.
If your e-cig uses removable batteries, we always recommend charging them in an external battery charger.
Vaping 101: Common Issues.
That’s the main elements covered for Vaping 101, let’s look at some common issues that vapers may encounter.
No Atomizer Found/Coil Read Errors
If the screen of the device is showing something along the lines of ‘coil read error’ or ‘no atomizer found’, it could mean a few things. It is a sign that your coil could need changing, or there could possibly be some liquid or lint blocking the connection between the tank and battery. In devices without a screen this issue is sometimes shown by the battery indicator light slowly flashing. Here’s a few steps to try when you’re faced with this.
- Disconnect the tank/pod. If you have a spare one that you know works, this is a great opportunity to test and see if it’s the tank or mod.
- Clean the connection. Sometimes the connections that link to the battery can be covered by debris or liquid. If you clean them using a bit of tissue, that can sometimes be the fix.
- If your coil screws into the base of the tank, make sure that it is properly screwed into place.
- Test to see if the cleaning worked.
- If cleaning the connections hasn’t worked try changing your coil.
If those steps didn’t resolve your issue, it might be a problem with the battery/mod itself. For further advice you can contact our friendly customer service staff, who are always available to help.
Burning Taste
A burning taste means that your coil has reached the end of its life. But there are a few causes of burnt cotton, especially if it’s relatively new.
- Old age. Coils will only last so long before they burn, depending on the brand and type of liquid being used.
- Sugary liquid. This can shorten the life of your coil drastically. Sweet liquids that contain sugars or sweeteners cause a build up on the heating element which burns them out incredibly quickly.
- Using the wrong type of liquid. Certain liquid ratios are compatible with different resistances. If you’re using a MTL coil you want to stick to 50/50 or 70/30 PG:VG. DL can handle 50/50 or 30/70 but usually not 70/30 as it’s too thin.
- Using the wrong wattage. As mentioned above, different resistances require their own wattage ranges. This is usually written on the side or bottom of the coil.
- Battery issues (rare). When a mod or battery is faulty it can cause too much or too little power to be delivered to the coil. This is more likely to happen if you’ve had your kit for a while.
Very rarely, you could get a faulty one out of the pack that burns out incredibly quickly. If you think this is the case, try another one.
Device Not Charging
If your device isn’t charging then the plug or cable being used to charge it could be faulty. Also, check that the plug and cable you’re using are compatible with your kit.
There could be a fault with the charge port itself.
The best thing to do is to try a different charger and cable. The next step would be to check the charge port for physical damage. If you’re still experiencing problems, feel free to contact our customer service team.
Coil Flooding
Flooding is basically caused by the coil not being able to vaporise the liquid fast enough, so when you draw on your kit, you get liquid in your mouth.
- End of life. When a coil is getting towards the end of its life it is more likely to flood.
- Not using your kit for a while. If you leave your kit for a while before vaping it again, liquid can pool at the bottom. When you try to use it again, there’s too much liquid in it to be vaporised.
- Vaping at too low wattage. If your power settings is set too low then it won’t have enough wattage to properly create vapour.
- Liquid is too thin. If your coil has large wicking areas, you have to be more careful about what liquid you use. If your liquid has too much PG then it can leak through your tank.
- Over filling. If you over fill your tank, the pressure can push liquid through the cotton and into the coil. This also results in flooding.
- Inhaling too hard on your kit. If you inhale too hard on a more restrictive coil, then it will draw too much liquid into it and cause flooding. Try using a lower resistance that allows for deeper inhalation.
Most of these issues can be solved by giving your kit a gentle flick downward, to remove excess liquid from the coil. Be careful if you’re using a pod kit though! Make sure you keep a finger on the pod to stop it coming off. Some handy advice from our customer service team is to wrap your tank/pod in kitchen roll or tea towel first. This ensures liquid stays away from furniture or carpets.
If the problem persists, try a coil change.
Tank Leaking
Tank leakage usually occurs through the airflow holes at the bottom of a tank. If you’re using a pod then there might be a lot of liquid build up under the pod. Again, there are a number of reasons that could cause this.
- Coil is on its way out. When a coil is due for a change, one of the first signs might be leaking. Towards the end of its life, the cotton can’t absorb liquid as well as it should.
- Coil isn’t fitted correctly. When inserted into the tank or pod, the coil creates a barrier that stops the liquid in the tank from leaking out. If it isn’t quite fitted properly then this can cause leaking.
- Damage to seals. There are several rubber seals on most tanks that help prevent leaking. If these are damaged then air will seep into the tank and cause it to leak.
- Cracked glass. Most tanks have a glass or plastic sleeve that holds the liquid. If there is a crack in this then you will probably experience some leaking.
Some liquid build up, especially on pod kits, is normal. Not all of the vapour produced is inhaled and what is left condenses at the bottom. Most vapers get into the habit of wiping this regularly to stop any leaking.
Support and Customer Services
If you have an issue with your kit and I haven’t covered it here, more information can be found on our support pages. There are a wealth of different topics that cover all aspects of vaping.
If you’re still lost after checking out our support pages then feel free to contact us. Our friendly and knowledgeable customer service team can help with any issues that you might be having. The last thing we want is for you to not have access to your vape. At the end of the day, us vapers need to stick together!
Also, if you’re a Reddit user, The Electronic Cigarette Company now has its very own sub Reddit! Feel free to post your questions there and we’ll reply as soon as we can. This community was set up to help and support vapers, in addition to discussing your favourite kits and liquids.
And there goes the bell! I hope you found our Vaping 101 class to be educational. Don’t worry, I’m not setting you any homework, not this time anyway!


